
 Smoking meat is a time-honored method that delivers distinctive flavor and tenderness, making it a favorite for many home cooks.
For those new to smoking, the three best meats to start with are pork shoulder, beef brisket, and chicken wings.
These selections are forgiving, readily available, and offer great results even for those without much experience.
Each meat offers a different experience—pork shoulder is ideal for pulled pork, brisket provides a classic barbecue texture, and chicken wings cook quickly while soaking up smoky flavors.
Beginners can achieve satisfying results with these cuts using simple techniques and basic seasoning.
Choosing the right meat makes the entire smoking process more approachable and sets up beginners for success.
These three cuts will help anyone building confidence with their smoker without complicated steps or hard-to-find ingredients.
Why Smoke Meat?
Smoking meat adds layers of flavor, improves longevity, and connects cooks with time-tested techniques.
It is both a culinary method and a tradition valued for its results and process.
Flavor Enhancement
Smoking infuses meat with distinct, complex flavors that cannot be achieved through other cooking methods.
Woods like hickory, cherry, oak, and mesquite impart unique aroma and taste profiles.
The slow, low heat allows smoke to penetrate the meat, producing a balance of savory, smoky, and sometimes slightly sweet notes.
Certain meats such as beef brisket, pork shoulder, and ribs absorb smoke very well due to their fat and connective tissue content.
The fat slowly renders, keeping the meat moist while distributing smoke flavor throughout each bite.
Dry rubs and marinades are commonly used.
They interact with smoke, creating a flavorful bark on the surface.
Many people find that smoked meats offer better depth and texture than grilled or roasted alternatives.
Preservation Benefits
Before refrigeration, smoking was a primary meat preservation method.
The process dries the surface and introduces antimicrobial compounds, which slow spoilage and inhibit bacterial growth.
Smoked meats, especially when cured, can last for weeks or months with proper storage.
This is especially valuable for hunters, small farmers, and those interested in self-sufficiency.
Some traditional preserved products include smoked sausages, hams, and fish.
Table: Typical Shelf Life of Smoked Meats
| Meat Type | Shelf Life (Refrigerated, Cured & Smoked) |
|---|---|
| Pork Shoulder (Ham) | 1-2 months |
| Smoked Sausage | 2-3 weeks |
| Smoked Fish | 1 week |
These preservation benefits are less critical today, but many still favor smoked products for their distinct texture and safety in storage.
Tradition and Craft
Smoking is rooted in culinary history, with methods and recipes passed down through generations.
In regions like the southern United States, Central Europe, and parts of Asia, smoking meat remains a central part of cultural identity.
Many enthusiasts appreciate the skill involved.
Temperature control, wood selection, timing, and preparation all play important roles.
Achieving consistently tender, flavorful meat requires patience and practice.
Smokehouses and outdoor smokers are gathering places, where friends and family share stories and meals.
The act of smoking meat is both a craft and a social tradition, tying people to culinary heritage and shared experiences.
Choosing the Right Meat for Smoking
Selecting the ideal meat impacts flavor, tenderness, and the final result.
Beginners should focus on forgiving cuts that can withstand longer cooking times, offer good value, and produce reliably tasty outcomes.
Factors for Beginners to Consider
Beginners should look for meats that are affordable, widely available, and simple to prepare.
Cuts like pork shoulder, whole chicken, and beef brisket are popular because they remain juicy and flavorful even if the cooking time is not perfect.
Smaller cuts, such as chicken thighs or sausages, cook faster and allow for easier temperature control.
Larger cuts, like pork butt or brisket, provide more margin for error since the higher fat and connective tissue prevent the meat from drying out quickly.
An easy way to compare options is with this table:
| Cut | Forgiving | Cost | Prep Complexity |
|---|---|---|---|
| Pork Shoulder | Yes | Low | Low |
| Chicken Thighs | Yes | Low | Very Low |
| Beef Brisket | Yes | Medium | Medium |
Choosing a cut that fits the desired time and skill level makes the smoking experience less stressful.
Marbling and Fat Content
Marbling is the fine strands of fat running through the meat.
Cuts with more marbling, like pork butt or certain grades of brisket, melt as they cook and make the meat moist and flavorful.
High fat content not only improves texture but also protects against mistakes such as overcooking.
Beginners should seek cuts with visible fat or intramuscular fat for better results during the low-and-slow smoke.
This keeps the meat juicy and creates a silky mouthfeel.
Lean cuts without much fat can turn dry or tough and are usually not recommended for those just starting out.
A simple check is to look for small white streaks throughout the meat; this means better marbling.
Cut Thickness
The thickness of a cut determines both how it cooks and the quality of the smoked flavor.
Thicker cuts, such as whole pork shoulders or full briskets, benefit from long cooking times, allowing smoke and heat to break down tough tissues and infuse flavors gradually.
Thin cuts, like chicken breasts or pork chops, cook fast but are prone to drying out, making them less ideal for smoking.
Opting for thicker cuts means more time for smoke penetration and a better chance for beginners to recover if temperatures fluctuate.
When buying, look for cuts at least 2 inches thick.
This helps ensure the meat stays moist and fully absorbs rich, smoky flavors during the cooking process.
Three of the Best Meats for Smoking
Selecting the right cut is critical for tender, flavorful barbecue.
Fatty or marbled cuts with plenty of connective tissue respond especially well to low-and-slow smoking, creating juicy, richly flavored results.
Pork Shoulder
Pork shoulder, sometimes labeled as pork butt or Boston butt, is a classic choice for smoking due to its high fat content and abundance of connective tissue.
The marbling keeps the meat moist through extended cooking, making it difficult to dry out even for beginners.
This cut benefits from a generous dry rub and can be smoked at 225–250°F (107–121°C) for 8–12 hours, depending on size.
As it cooks, the collagen melts, resulting in pull-apart tender meat that works well for pulled pork sandwiches or tacos.
The forgiving nature of pork shoulder means novice smokers can experiment with wood types like hickory or apple without worrying about ruining the final product.
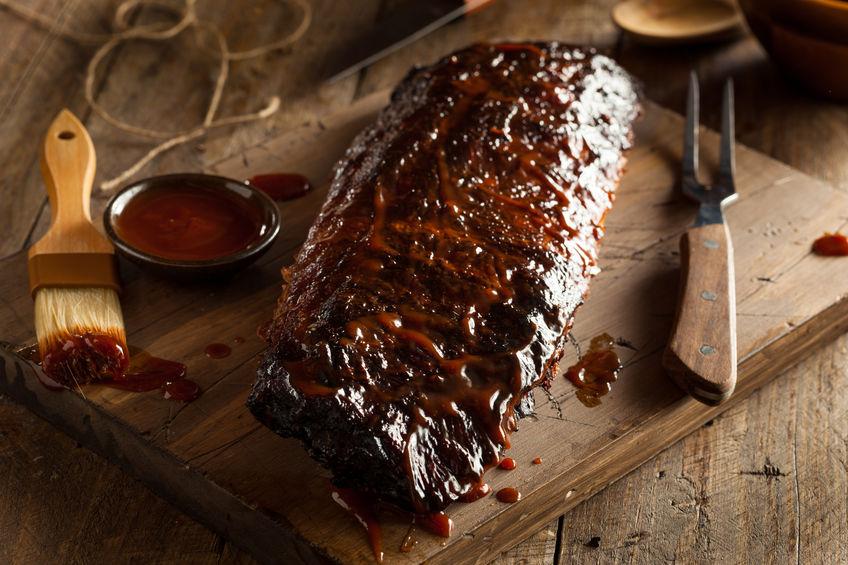
Beef Brisket
Beef brisket is iconic in barbecue, valued for its deep, beefy flavor and substantial texture.
Composed of two sections—the flat and the point—brisket contains thick layers of fat and tough muscle fibers that become tender and juicy with proper smoking.
A whole packer brisket benefits from a simple rub of salt and pepper.
It is best smoked at 225°F (107°C) for 10–16 hours, depending on weight and thickness.
Internal temperature should reach 195–205°F (90–96°C) for ideal tenderness.
Resting the brisket after cooking is essential for juicy slices.
Beginners find brisket rewarding, as the transformation from tough to tender highlights the benefits of low-and-slow smoking.
Chicken Thighs
Chicken thighs are well-suited to smoking, offering a balance of rich flavor and forgiving texture.
The higher fat content keeps the meat juicy, while the relatively small size means faster cook times.
Season thighs with a dry rub or marinade and smoke at 225–250°F (107–121°C) for around 1.5–2 hours.
Unlike chicken breast, thighs remain moist even if slightly overcooked, giving beginners room for error.
Chicken thighs pair well with a wide variety of wood types, such as cherry, pecan, or apple, and can be served as-is, shredded for tacos, or chopped into salads.
Getting Started with Pork Shoulder
Pork shoulder is an excellent entry point for anyone new to smoking meat.
With its forgiving texture and flavor, this cut helps beginners build confidence and develop essential barbecue skills.
Why Pork Shoulder is Ideal
Pork shoulder, sometimes called pork butt or Boston butt, is one of the most recommended cuts for beginner smokers.
Its high fat content keeps the meat moist during the long, slow smoking process, reducing the risk of the meat drying out.
The cut is also rich in connective tissue, which, when cooked low and slow, breaks down into gelatin for a tender finished product.
This forgiving nature means small mistakes in time or temperature are less likely to ruin the final result.
The flavors are bold but not overpowering, and pork shoulder is very versatile in seasoning and serving.
Whether pulled for sandwiches or sliced for platters, it consistently delivers satisfying results.
Preparation Tips
Proper preparation ensures great texture and flavor. Start by trimming excess surface fat, leaving a thin layer for moisture and taste.
Apply a dry rub generously, covering every side.
A typical rub combines salt, black pepper, paprika, garlic powder, and brown sugar.
Let the seasoned pork shoulder rest in the refrigerator for at least a few hours, or preferably overnight, to allow the flavors to penetrate the meat.
Before smoking, bring the meat to room temperature.
Insert a meat thermometer into the thickest part for monitoring doneness.
Place the pork shoulder fat side up on the smoker to keep it moist as it cooks.
Best Woods for Smoking Pork
Choosing the right wood influences the final flavor profile.
Fruitwoods like apple and cherry provide a mild, slightly sweet smoke that pairs well with pork.
Hickory adds a stronger, more traditional smoky flavor, which is popular for classic barbecue.
Use the table below as a quick guide for wood selection:
| Wood Type | Flavor Profile | Recommended For |
|---|---|---|
| Apple | Mild, subtly sweet | Beginners |
| Cherry | Slightly sweeter, light smoke | Tender results |
| Hickory | Strong, deep smoke | Bold flavor |
Avoid harsh woods like mesquite, as they can overpower pork shoulder’s taste.
Balancing smoke and seasoning produces the best results for juicy, flavorful meat.
Mastering Beef Brisket for Beginners
Brisket is a classic choice for smoking because of its rich beef flavor and forgiving texture.
With the right preparation and careful control of heat, anyone can produce a tender, flavorful brisket.
Flavor Profile of Brisket
Beef brisket has a deep, robust flavor that stands up well to smoke.
The cut contains a good amount of marbling, allowing it to retain moisture during long cooking times.
This makes it ideal for beginners, since it doesn’t dry out as quickly as leaner cuts.
Common woods for smoking brisket include oak, hickory, and pecan.
These provide a balanced smoke note that complements the meat without overpowering it.
Brisket’s beefy taste pairs well with simple seasoning, letting the natural flavor shine through.
When done properly, smoked brisket features a tender texture, a flavorful (but not overly salty) bark, and a subtle smoke ring just beneath the surface.
The smoky, savory flavors make it a crowd-pleaser at any gathering.
Trimming and Seasoning
Trimming brisket helps control how fat renders and prevents chewy bites.
Beginners should trim excess fat, leaving about 1/4 inch on the fat cap for moisture and flavor.
Removing hard, thick fat sections around the edges is also important, as they don’t fully render during smoking.
For seasoning, simplicity works best.
A traditional brisket rub uses just coarse salt and black pepper in equal parts.
Apply the rub generously over every surface and gently press it into the meat.
More advanced rubs might include garlic powder, paprika, or chili powder.
Let the seasoned brisket rest at room temperature for 30–60 minutes before placing it in the smoker.
This resting period helps the seasoning adhere and start forming the bark.
Smoke Time and Temperature
Consistent temperature is key when smoking brisket.
Most pitmasters recommend smoking brisket at 225–250°F (107–121°C).
At this range, brisket cooks slowly and absorbs smoke well, resulting in a tender product.
Smoking times vary based on size, but a general guideline is 1–1.5 hours per pound.
For example, a 10-pound brisket typically needs 10–15 hours.
Use a meat thermometer to monitor internal temperature.
Brisket is ready when the internal temperature reaches 195–203°F (90–95°C) and feels tender when probed.
Let the brisket rest, wrapped in butcher paper or foil, for at least 30 minutes before slicing. This step locks in juices and improves texture.
Smoking Chicken Thighs the Easy Way
Chicken thighs are a practical choice for smoking, offering juicy texture, forgiving cook times, and a strong ability to absorb smoke flavor.
Proper preparation, seasoning, and wood selection are key for delicious, tender results.
Advantages of Chicken Thighs
Chicken thighs stand out because of their higher fat content compared to other cuts like breasts.
This extra fat keeps the meat moist throughout the smoking process, reducing the risk of dry or tough results.
Bone-in, skin-on thighs are especially forgiving for beginners.
They handle longer smoke times with less risk of overcooking while the skin crisps up nicely if cooked at the right temperature.
Chicken thighs are also affordable and widely available.
Their uniform size means even smoking and consistent results in both flavor and texture.
Most people find these cuts easier to work with and more flavorful than white meat.
Preparation and Brining
Proper preparation starts by patting the thighs dry and trimming any loose fat or excess skin.
Season them generously with a simple rub of salt, pepper, garlic powder, and paprika for basic flavor.
Brining is recommended for best results.
A basic brine solution is made from water, kosher salt, and a small amount of sugar.
Soak the thighs in this mixture for 2-4 hours in the fridge to boost juiciness and help the meat retain moisture during smoking.
After brining, dry the thighs thoroughly and apply the dry rub.
Let them rest at room temperature for about 20 minutes before placing them in the smoker.
This step helps the skin crisp up during cooking.
Recommended Woods for Poultry
Choosing the right wood influences both flavor and aroma.
Milder fruitwoods such as apple and cherry are favored for chicken because they add subtle sweetness without overpowering the meat.
Hickory can also be used in small amounts, but too much may give the chicken a strong or even bitter taste.
For a balanced smoke profile, mix a mild wood (like apple) with a little pecan or hickory.
Here’s a quick comparison:
| Wood | Smoke Strength | Flavor Profile |
|---|---|---|
| Apple | Mild | Sweet, fruity |
| Cherry | Mild | Sweet, slightly tart |
| Hickory | Medium-strong | Smoky, bacon-like |
| Pecan | Medium | Nutty, slightly sweet |
This allows beginners to achieve a good balance of flavor while reducing the chance of oversmoking the chicken.
Smoking Equipment Essentials
Selecting the right smoker, tools, and safety measures ensures a smoother smoking experience, especially for beginners.
Each piece of gear serves a specific purpose, helping maintain consistent flavor, temperature, and safety throughout the process.
Types of Smokers
Smokers come in several forms, each with unique advantages and learning curves.
The most beginner-friendly types are electric and pellet smokers, which allow for easier temperature control and require minimal tending.
These models often feature digital controls and automated pellet feeders.
Charcoal smokers offer authentic smokey flavor.
However, they require frequent adjustments and practice to master airflow.
Wood smokers deliver deep, rich flavors but involve more hands-on work and experience in maintaining consistent heat.
| Smoker Type | Pros | Cons |
|---|---|---|
| Electric | Easy to use, set-and-forget, consistent | Less smokey flavor |
| Pellet | Simple control, good flavor | More expensive |
| Charcoal | Authentic flavor, affordable | Requires attention, messier |
| Wood | Deep flavor, traditional | Steep learning curve |
When choosing a smoker, consider both skill level and the amount of time available for tending the meat.
Thermometers and Tools
A digital meat thermometer is essential for accurate, safe cooking.
Built-in thermometers on smokers are often imprecise, so investing in a quality digital probe offers more reliable results.
Thermometers with multiple probes allow tracking both meat and ambient smoker temperatures at once.
Useful tools for beginners include long-handled tongs, heat-resistant gloves, and a sturdy grill brush.
These items help turn and handle meat safely without risk of burns.
Spray bottles are also helpful for misting the meat to maintain moisture.
Keep a notebook or smartphone app for logging temperatures and times.
This practice helps identify what works best and improves results over time.
Setup and Safety
Setting up a smoker requires choosing a stable, flat surface with good ventilation.
Avoid placing smokers near flammable materials, decks, or overhanging branches.
For indoor storage, only move the smoker indoors after it has completely cooled and contains no coals or embers.
Always keep a fire extinguisher nearby.
Know how to cut off fuel or power quickly in case of an emergency.
Never leave a running smoker unattended, especially when children or pets are present.
Before each use, check that all parts, seals, and grates are clean and undamaged.
Remove grease buildup regularly to prevent flare-ups.
Proper setup and safety routines reduce the risk of accidents and help ensure a smooth smoking experience.
Common Mistakes to Avoid When Smoking Meat
Achieving great results with smoked meat requires careful attention to temperature, smoke application, and proper resting times.
Addressing these common mistakes will help beginners avoid unnecessary frustration and get better results right from the start.
Temperature Fluctuations
Keeping a consistent temperature is essential during smoking.
Sudden drops or spikes can lead to uneven cooking, dry meat, or even food safety issues.
Beginners may open the smoker too often to check on their meat, which lets heat escape and causes instability.
To avoid this, use a quality digital thermometer to monitor both the smoker’s internal temperature and the meat itself.
Preheat the smoker properly before adding meat, and resist the urge to constantly make adjustments or peek inside.
Each time the lid or door is opened, recovery to the correct temperature takes time.
Wind, outside temperature, and the type of smoker all influence heat retention.
If possible, position the smoker away from direct wind, and shield it from extreme cold or rain.
Maintaining steady heat is one of the best ways to ensure meat cooks evenly and retains moisture.
Over-Smoking
Adding too much smoke or combusting the wrong type of wood can overpower the flavor and create a bitter taste.
Beginners sometimes think more smoke means better flavor, but excessive smoke can actually ruin the end result.
The smoke should be thin and blue, not thick and white.
Using only seasoned hardwoods like oak, hickory, or fruitwoods helps prevent harshness.
Avoid resinous woods such as pine, which create unpleasant flavors and can even deposit harmful compounds on the meat.
For those learning, start with less wood and add more only if a stronger flavor is really needed.
Remember, a little smoke goes a long way.
Balanced, mild smokiness enhances the natural taste of meat without overwhelming it.
Improper Resting
Skipping or shortening the resting period is a common mistake that leaves smoked meat dry and less flavorful.
After cooking, the juices inside meat need time to redistribute. Slicing too soon causes those juices to run out, resulting in tougher, drier servings.
Rest smoked meats such as brisket, pork shoulder, or ribs for at least 20–30 minutes, loosely tented with foil.
Larger cuts may need 45 minutes to an hour. Resting not only improves juiciness but also allows the internal temperature to stabilize.
For best results, use a kitchen towel and place the foiled meat in a cooler.
This maintains warmth and maximizes moisture retention before carving or serving.
Best Practices for Juicy and Flavorful Results
Getting the best flavor and consistency from smoked meats depends on controlling moisture, understanding optimal cook times, and letting meat rest properly.
Each step plays a direct role in making sure the final results are both tender and packed with flavor.
Maintaining Moisture
Moisture control is essential for good barbecue.
Using a water pan inside the smoker is one of the most effective ways to keep the cooking chamber humid, reducing the risk of the meat drying out.
This is especially helpful for longer smoking sessions and for cuts like brisket and pork shoulder.
Mopping or spritzing the meat with a water, apple juice, or vinegar mixture every hour can also help retain moisture.
Wrapping meats like ribs or brisket in foil or butcher paper about halfway through cooking (often called the “Texas Crutch”) helps prevent evaporation and accelerates the tenderizing process.
Keep the smoker temperature steady, aiming for 225°F to 250°F.
Avoid opening the lid too often, as this releases heat and moisture, making it harder to maintain a consistent, humid environment.
Timing and Patience
Low and slow cooking is the trademark of smoking.
Most cuts used in smoking, such as pork shoulder and brisket, require several hours at low temperatures to break down collagen and fats fully.
Rushing this process by increasing heat can lead to tough or dry results.
Use a reliable digital thermometer to monitor both the internal temperature of the meat and the chamber. Key target temperatures are:
| Cut of Meat | Finished Temp |
|---|---|
| Brisket | 200–205°F |
| Pork Shoulder | 195–205°F |
| Chicken Thighs | 170–175°F |
Plan for ample time. Some cuts can take 8–12 hours or more, depending on thickness and weight.
Starting early and building in extra cook time prevents hurried decisions at the end.
Resting Techniques
Resting meat after smoking allows juices to redistribute, making every bite more tender.
For large cuts like brisket or pork shoulder, let them rest wrapped in foil or butcher paper and place them in a cooler or insulated container.
A rest period of at least 30–60 minutes is recommended for most large cuts.
Smaller items, like chicken thighs, benefit from a quick rest of 10–15 minutes on a cutting board, loosely tented with foil.
Proper resting also makes slicing easier and helps reduce the loss of moisture.
Avoid cutting meat immediately after removing it from the smoker to keep the results as juicy as possible.