

 Getting your grill to the right temperature is the foundation of successful barbecuing, yet many backyard cooks struggle to determine when their grill is actually ready.
The most reliable way to tell if a grill is hot enough is to hold your hand five inches above the grates and count how many seconds you can comfortably keep it there – two to three seconds indicates high heat perfect for searing, while four to five seconds means medium heat ideal for most cooking.
Different grilling methods and food types require specific temperature ranges to achieve optimal results.
A steak needs intense heat for proper searing, while chicken requires more moderate temperatures to cook through without burning.
Understanding these temperature requirements and recognizing the visual and physical cues that indicate readiness can transform anyone’s grilling experience.
This guide explores the various methods for determining grill temperature, from traditional hand tests to modern thermometer techniques.
Readers will learn how different grill types behave, what signs indicate proper heating, and how to maintain consistent temperatures throughout the cooking process for consistently delicious results.
Why Grill Temperature Matters
Proper grill temperature directly affects how food cooks and determines whether meals are safe to consume.
The heat level controls cooking speed, texture development, and bacterial elimination.
Impact on Food Quality
Grill temperature controls the cooking process and determines the final quality of barbecue dishes.
Different foods require specific heat levels to achieve optimal results.
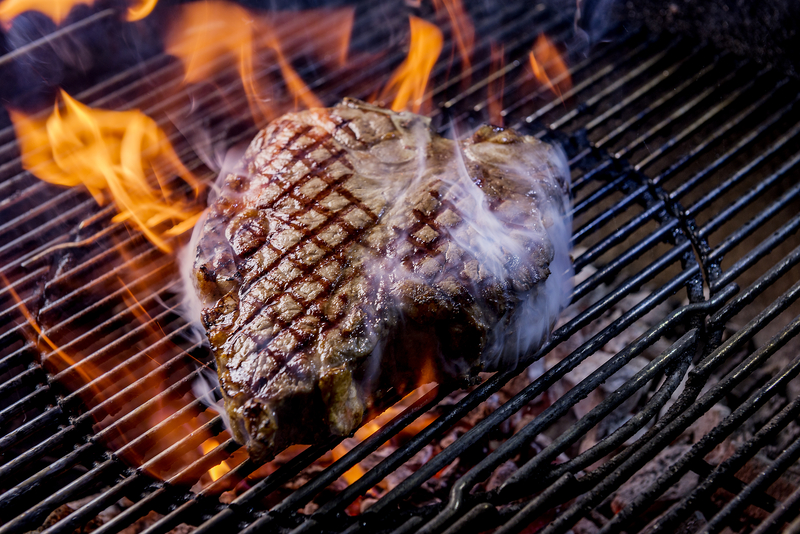
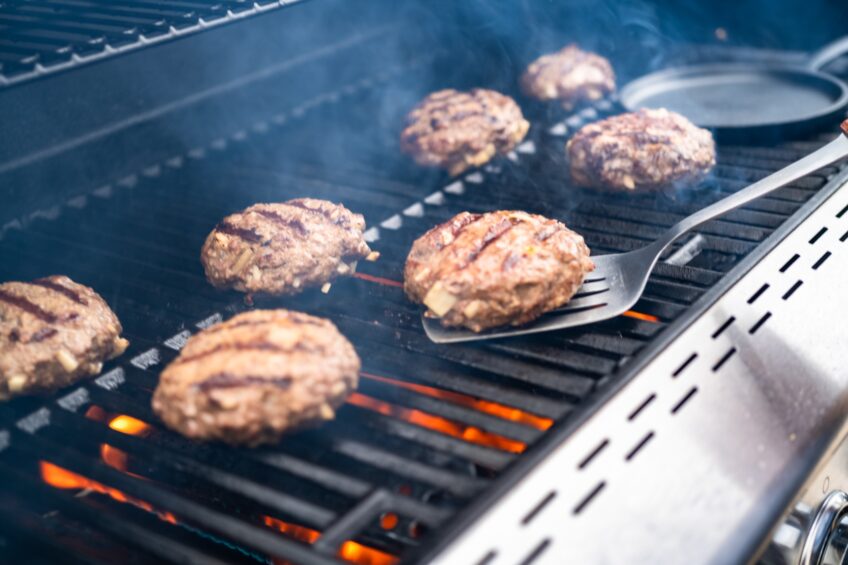
High heat (450°F-500°F) creates the perfect sear on steaks and burgers.
This temperature range caramelizes proteins quickly, forming a flavorful crust while keeping interiors tender.
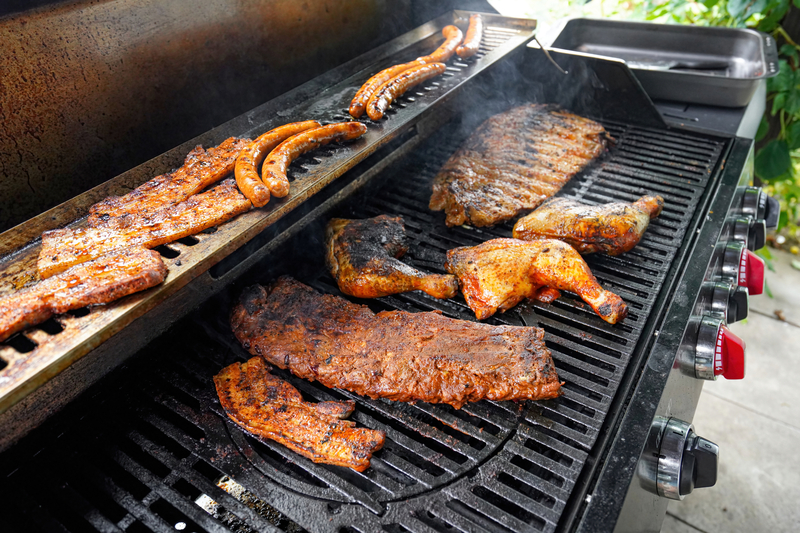
Medium heat (350°F-400°F) works best for chicken pieces, pork chops, and fish.
These proteins need gentler cooking to prevent burning while ensuring thorough preparation.
Low heat (250°F-300°F) suits larger cuts like whole chickens or roasts.
Slow cooking at lower temperatures breaks down tough fibers and creates tender, juicy results.
Wrong temperatures produce disappointing outcomes.
Steaks cooked on low heat become gray and tough.
Chicken grilled on high heat burns outside while remaining raw inside.
Ensuring Food Safety
Proper grilling temperatures eliminate harmful bacteria and prevent foodborne illness.
Heat destroys pathogens that can cause serious health problems.
Chicken and turkey must reach 165°F internal temperature.
Insufficient heat leaves dangerous salmonella and campylobacter bacteria alive in poultry.
Ground beef requires 160°F internal temperature.
The grinding process spreads bacteria throughout the meat, making thorough cooking essential.
Whole cuts of beef and pork need 145°F minimum internal temperature.
Surface bacteria die quickly, but internal temperatures must reach safe levels.
Inadequate grill heat extends cooking times and creates uneven results.
Food may appear done externally while remaining unsafe internally.
Consistent, appropriate temperatures ensure both safety and quality in barbecue cooking.
Types of BBQ Grills and Their Heating Characteristics
Different grill types have distinct heating patterns and temperature indicators that affect when they’re ready for cooking.
Charcoal grills require visual cues and hand tests to gauge readiness, while gas grills offer more predictable preheating times with built-in temperature controls.
Charcoal Grills: Heat and Readiness
Charcoal grills reach cooking temperatures through a gradual heating process that requires patience and observation.
Charcoal briquettes typically take 15-20 minutes to reach optimal cooking temperature, while lump charcoal heats faster at 10-15 minutes.
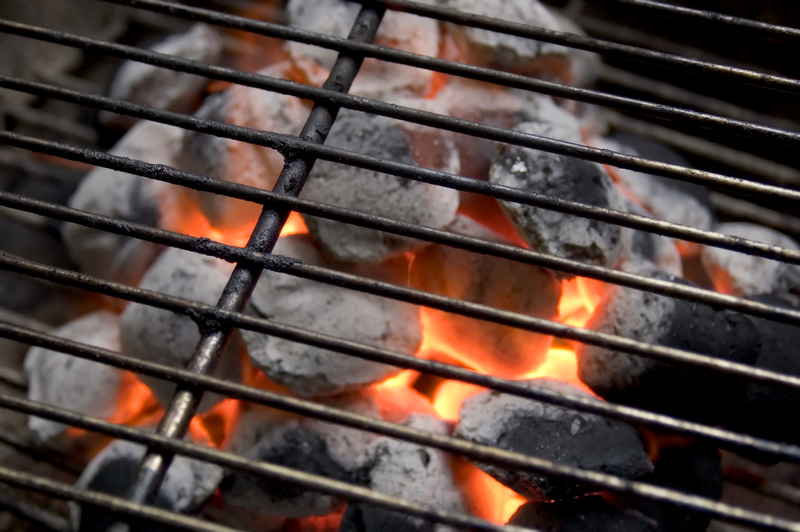
The coals are ready when they develop a thin layer of gray ash covering the surface.
Red-hot coals without ash indicate the grill is too hot for most cooking applications.
Temperature zones form naturally in charcoal grills.
The center directly over coals reaches the highest heat, while edges provide cooler cooking areas.
Hand test method:
- Hold your hand 5 inches above the grates
- High heat: 2-3 seconds before pulling away
- Medium heat: 4-5 seconds
- Low heat: 6-8 seconds
Charcoal grills can reach temperatures up to 700°F, making them excellent for searing steaks and achieving high-heat cooking.
Gas Grills: Preheating and Consistency
Gas grills offer predictable heating with built-in temperature gauges for accurate monitoring.
Most gas grills reach cooking temperature within 10-15 minutes of preheating with the lid closed.
The temperature control knobs allow precise heat adjustment between 400-600°F on most models.
This consistency makes gas grills ideal for foods requiring specific temperature ranges.
Preheating indicators:
- Built-in thermometer reaches desired temperature
- Grates feel hot when tested with water droplets that sizzle immediately
- Even heat distribution across the cooking surface
Gas grills maintain steady temperatures throughout the cooking process.
The fuel burns cleanly and provides instant heat adjustment when turning control knobs.
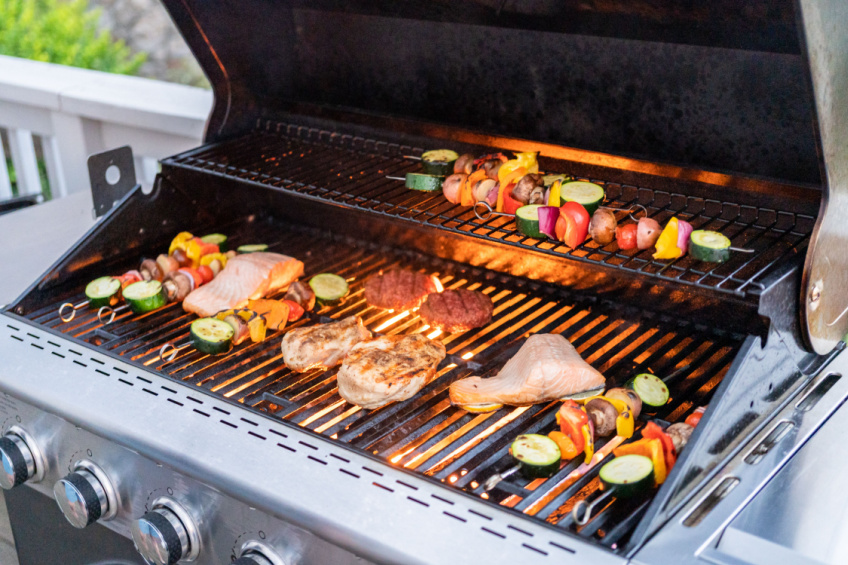
Multiple burner systems create distinct heat zones.
Users can operate different sections at various temperatures for versatile cooking methods on a single grill.
Methods to Check If Your Grill Is Hot Enough
Several reliable techniques help determine proper grill temperature before cooking begins.
These methods range from traditional hand testing to modern thermometer readings and visual assessment of fuel conditions.
Hand Test and Timing
The hand test provides a quick temperature assessment without any equipment.
A person holds their hand approximately five inches above the cooking grate and counts how long they can maintain that position comfortably.
Different timing intervals indicate specific temperature ranges:
| Time Range | Temperature | Heat Level |
|---|---|---|
| 1-2 seconds | 500°F+ | Very Hot |
| 3-4 seconds | 400-450°F | Hot |
| 5-6 seconds | 350-400°F | Medium-Hot |
| 7-8 seconds | 300-350°F | Medium |
| 9-10 seconds | 250-300°F | Low |
This method works effectively for both gas and charcoal grills.
The technique requires practice to develop accuracy and should be performed carefully to avoid burns.
Using Grill Thermometers
Grill thermometers provide precise temperature readings for consistent cooking results.
Most modern gas grills include built-in thermometers mounted in the lid, though these may not reflect the actual cooking surface temperature.
A meat thermometer can be inserted through grill grates to measure temperature at the cooking level.
This method offers more accurate readings than lid-mounted gauges since it measures heat where food actually cooks.
Infrared thermometers deliver instant surface temperature readings when pointed at the grates.
These devices eliminate guesswork and provide professional-level accuracy for temperature control.
Target temperatures vary by cooking method:
- High heat: 450-500°F for searing
- Medium heat: 350-400°F for most grilling
- Low heat: 250-300°F for slow cooking
 If you’re looking for a reliable digital thermometer to monitor your grill’s temperature, the Escali AHG2 Stainless Steel Direct Grill Surface Thermometer is a top choice.
If you love grilling, you know that controlling the heat is just as important as choosing the right cut of meat.
That’s where a purpose-built grill thermometer makes all the difference.
Designed specifically to measure the surface temperature of your grill, it ensures that your cooking conditions are always optimal, helping you avoid overcooked or undercooked meals.
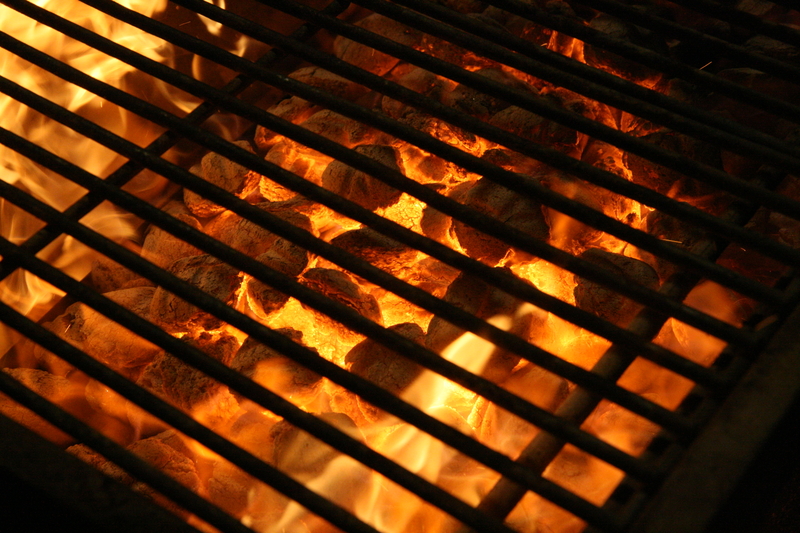
Visual Clues on Charcoal and Flames
Charcoal color indicates temperature levels during grilling.
Red-hot coals with minimal ash produce the highest heat for searing.
Orange coals with light ash coverage provide medium-high temperatures suitable for most grilling tasks.
Gray coals with thick ash indicate lower temperatures appropriate for slower cooking methods.
Completely ash-covered charcoal produces minimal heat and may need replacement or repositioning.
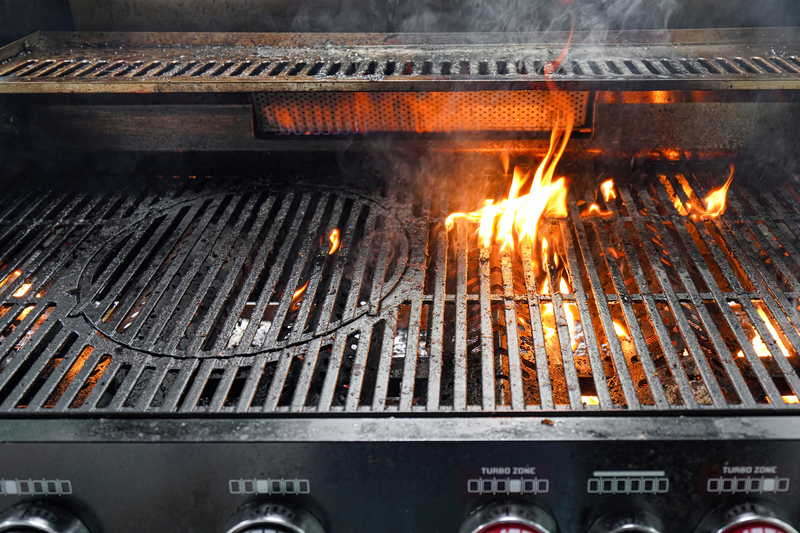
Gas grill flames should burn blue with minimal yellow tips.
Yellow flames indicate incomplete combustion and lower temperatures.
Steady blue flames demonstrate proper gas flow and optimal heating conditions.
Wind conditions affect flame appearance and heat distribution.
Strong winds can create uneven heating patterns that require grill positioning adjustments or windscreen installation.
Key Signs Your Grill Is Ready to Cook
Recognizing when your grill reaches optimal cooking temperature requires observing specific visual cues, understanding temperature requirements for different foods, and ensuring consistent heat distribution.
These indicators work together to signal the perfect moment to begin grilling.
Color and Ash on Charcoal
Charcoal briquettes are ready when they develop a uniform grayish-white ash coating across their surface.
This ash layer indicates the coals have burned through their initial lighting phase and reached stable cooking temperatures.
The transformation typically takes 20-30 minutes after lighting.
Lump charcoal follows similar patterns but may burn slightly faster due to its irregular shape and composition.
Black or partially black coals signal incomplete heating.
These coals haven’t reached proper temperature and will produce uneven cooking results.
The ash should cover at least 80% of each coal’s surface.
Some red-hot spots remaining underneath the ash are normal and desirable for high-heat grilling applications.
Temperature Ranges for Different Foods
Different grilling tasks require specific temperature ranges for optimal results.
Understanding these ranges helps determine when your grill is ready for particular foods.
| Heat Level | Temperature | Hand Test Duration | Best For |
|---|---|---|---|
| High | 450-550°F | 2-3 seconds | Steaks, burgers |
| Medium-High | 400-450°F | 4-5 seconds | Chicken pieces, fish |
| Medium | 350-400°F | 6-8 seconds | Vegetables, thicker cuts |
| Low | 250-300°F | 10+ seconds | Slow cooking, indirect heat |
The hand test involves holding your palm 5-6 inches above the grates.
Count how long you can comfortably maintain this position to gauge temperature.
Checking for Steady Heat
Consistent heat distribution ensures even cooking across the entire grilling surface.
Check multiple spots on your grill grates using the hand test method.
Hot spots and cool zones indicate uneven coal distribution or gas burner issues.
Adjust charcoal positioning or check gas connections to achieve uniformity.
Grilling requires stable temperatures that don’t fluctuate dramatically.
Observe your grill thermometer for 5-10 minutes to confirm steady readings.
Visual indicators include consistent sizzling sounds when food contacts the grates.
Water droplets should evaporate immediately when sprinkled on hot grates, confirming proper surface temperature.
Preparing the Grill for Accurate Temperature
Proper fuel selection and thorough cleaning create the foundation for consistent temperature readings.
The preheating process activates temperature gauges and ensures even heat distribution across cooking surfaces.
Fuel Choice and Set-Up
Gas grills offer immediate temperature control through adjustable burners.
Users should check propane tank levels before cooking and ensure all connections are secure.
Charcoal briquettes provide steady, long-lasting heat but require 15-20 minutes to reach cooking temperature.
They burn more uniformly than other charcoal types.
Lump charcoal ignites faster and burns hotter than briquettes.
It reaches cooking temperature in 10-15 minutes but may create uneven heat zones.
Lighter fluid should be applied sparingly to avoid chemical flavors.
Allow the fluid to soak for 2-3 minutes before igniting.
Alternative lighting methods include chimney starters or electric starters.
Arrange coals in zones for different temperature areas.
Place more coals on one side for direct high heat and fewer on the other for indirect cooking.
Cleaning and Preheating Procedures
Clean grates remove grease buildup that causes temperature fluctuations and flare-ups.
Scrape grates with a wire brush while they’re warm for easier cleaning.
Remove ash and debris from the firebox before adding new fuel.
Blocked air vents restrict oxygen flow and reduce maximum temperatures.
Preheat with the lid closed for 10-15 minutes minimum.
This activates built-in thermometers and brings cooking surfaces to target temperature.
Gas grills should preheat on high before adjusting to desired cooking temperature.
Charcoal requires adequate ventilation through bottom and top vents during preheating.
Check that thermometer probes are clean and properly positioned at grate level for accurate readings.
Maintaining and Adjusting Grill Temperature While Cooking
Successful temperature control during cooking requires managing airflow, adjusting fuel levels, and monitoring with proper thermometers.
These three elements work together to maintain consistent heat throughout the grilling process.
Managing Airflow and Vents
Airflow control serves as the primary method for fine-tuning temperature on a charcoal grill.
The bottom vents regulate oxygen flow to the coals, while the top vents control heat retention and smoke circulation.
Opening the bottom vents wider increases airflow and raises temperature.
Closing them partially reduces heat by limiting oxygen to the fuel source.
Bottom Vent Settings:
- Wide open: Maximum heat (450°F+)
- Half open: Medium-high heat (350-450°F)
- Quarter open: Medium heat (300-350°F)
- Nearly closed: Low heat (250-300°F)
Top vents should remain mostly open during cooking to prevent heat buildup and maintain proper smoke circulation.
Closing top vents completely can extinguish the fire and create bitter smoke flavors.
Gas grills rely less on vent management since burner controls provide direct temperature adjustment.
However, opening the lid briefly can help reduce excessive heat buildup.
Adding or Reducing Fuel
Fuel management differs significantly between charcoal grill and gas grill setups.
Each requires specific techniques to maintain steady temperatures during extended cooking sessions.
For charcoal grills, adding fresh coals maintains heat levels during long cooking periods.
Place new charcoal around the edges of existing hot coals rather than directly on top.
Charcoal Addition Guidelines:
- Add coals every 45-60 minutes for extended cooking
- Use pre-lit coals from a chimney starter
- Maintain original coal arrangement patterns
Gas grills offer simpler fuel control through burner adjustments.
Turn burner knobs clockwise to increase heat or counterclockwise to reduce temperature.
Most gas grills feature multiple burners for creating heat zones.
Keep one burner on high for searing while maintaining others at medium or low temperatures.
Monitor propane levels regularly during cooking sessions.
Low fuel pressure can cause temperature drops and uneven heating patterns.
Monitoring with Thermometers
A reliable grill thermometer provides accurate temperature readings at grate level where food actually cooks.
Built-in lid thermometers often read 50-100°F higher than actual cooking surface temperatures.
Place the grill thermometer directly on the cooking grate for precise measurements.
Digital probe thermometers offer the most accuracy for monitoring grill temperature changes.
Thermometer Placement Tips:
- Position away from direct flame contact
- Place at food level, not near the lid
- Use multiple thermometers for large grills
A meat thermometer serves a different purpose by measuring internal food temperatures.
Insert the probe into the thickest part of meat to ensure proper doneness.
Check grill temperature every 15-20 minutes during cooking.
Temperature fluctuations of 25-50°F are normal and manageable with minor adjustments.
Digital wireless thermometers allow remote monitoring without lifting the grill lid.
This prevents heat loss and maintains more consistent cooking temperatures.